You should now know how to use SigmaStudio and about level matching as a prerequisite for best possible sound. Time to actually make the DSP do something. Like a crossover with a Linkwitz transform.
Its easy to assume the sound chain to look something like this if using the DSP as an active crossover:
What if the source is a CD-player with an output level of 2.0 Vrms, a preamp with a 12 dB amplification and power amps with an input sensitivity of 1.5 Vrms. Not an uncommon scenario. 2 V amplified 12 dB would be close to 8 V so the input on the DSP would clip like crazy. A bog standard ADAU1701-based DSP would output max 0.9 Vrms and that is almost 4.5 dB less than the power amps sensitivity. You get the picture. With that said lets start SigmaStudio...
This will be a quite simple project but lets start with the concept of Hierarchy Boards. Its a great way to structure more complex projects and to make reusable building blocks. A Hierarchy Board is like a virtual container and you can connect this kind of containers together with Hierarchy Inputs and Outputs.
Start by adding a Hierarchy Board from the Systems ToolBox to your project. You will now have an empty board named Board1 and another section next to the Main section with the same name. Rename it to Input and switch to the Input section. Add the following blocks to the Input Hierarchy Board:
- Input from the IO ToolBox
- DC Blocking from the Filters ToolBox
- 2x Hierarchy Output from the Systems ToolBox
Right-click the DC Blocking filter -> Add Algorithm -> IC 1 -> DC Blocking. You can also rename the blocks to something that makes sense and connect them togheter. The Hierarchy Board should now look something like this:
And your Main project now look like this (you get the concept):
You might want to add high-cut and low-cut filters to the Input board if you don't got the hearing of a dolphin. It will cut some crap out and protect from rumble and overdriving the elements from something like a Linkwitz transform. You can chain a set of lower order filters or use the
Nth Order Filter from the Filters ToolBox.
In the example above I'v used two Nth Order Filter set to 6th order Butterworth. Low cut frequency set to 15 Hz and high cut to 22 kHz. You might think you can set it to 25 kHz but DON'T DO IT! SigmaStudio will happily accept 25000 as input without a warning BUT the result will be an awful noise from the filter that will blow your tweeters (don't ask me how I know)! These are the happy surprises you get from playing around with SigmaStudio...
Create a new Hierarchy Board, name it Output and add the following blocks:
- 4x Hierarchy Input from the Systems ToolBox
- 2x Peak Full Range (no gain) from the Dynamics Processors ToolBox
- 4x Output from the IO ToolBox
Right-click the compressors -> Add Algorithm -> IC 1 -> Stereo Peak Full Range (No Post Gain). Enable the Soft Knee on both compressors (click the GUI button). Rename the blocks to something useful and connect them together. You should end up with something like this:
The kind of and compressor or limiter and their setup is a subjective choice. Press the GUI button named Show Graph to configure it. You might also want to tweak the Hold and Decay values.
Switch back to the Main schematics and add 2x
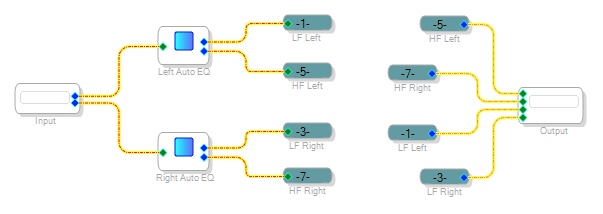
Automatic Speaker EQ blocks from the ADI Algorithms ToolBox. Right-click each block -> Add Algorithm -> IC 1 -> Two-Way Speaker PEQ. Connect the left and right outputs from the Input Hierarchy Board to one of each and rename them. Right-click the top blue output pin on each EQ block and select Alias. This is another way of organising your projects. An alias is like a logical net port in an
EDA/CAD software. Name the top alias LF Left and Right. Do the same with the bottom pins and name them HF Left and Right. Connect the correct Alias to each input on the Output Hierarchy Board. You should now have something looking like this:
The
Automatic Speaker EQ block is very useful and can do a lot. The Single Band Automatic Speaker EQ algorithm can be used to tune a fully passive speaker. The Two-Way Speaker PEQ algorithm can be used for a 2-way or semi active 3-way speaker. It does the crossover, phase alignment and additional EQ needed for a set target line. The Three-Way Speaker PEQ algorithm does the same for a 3-way.
I am using a semi-active speaker in this example (it has a passive crossover between the mid and tweeter). It has been meassured with the mid and tweeter responses combined and the woofer separately. Measurements was done with
REW and exported in text format. They where then converted to SigmaStudio ASCII MLSSA Response format. I used this Python script to do the conversion:
#!/usr/bin/env python3
import argparse
"""Rew2SigmaStudio, a script to convert from REW to SigmaStudio MLSSA text format."""
parser = argparse.ArgumentParser(description='Convert REW files for use in SigmaStudio.')
parser.add_argument('input', help='Input File')
parser.add_argument('-o', '--output', help='Output File')
args = parser.parse_args()
if not args.output:
args.output = '{}-MLSSA.txt'.format(args.input)
with open(args.input, 'r') as infile:
with open(args.output, 'w') as outfile:
print('"MLSSA text file for SigmaStudio converted from REW."', file=outfile)
print(' "Hz" "Mag (dB)" "deg"', file=outfile)
for line in infile:
if not line.startswith('*'):
tokens = line.split(maxsplit=3)
print(', '.join([token.rjust(10) for token in tokens]), file=outfile)
Note: export the response with a sane amount of resolution. Too much data will choke the Automatic EQ Wizard. You have been warned.
With the MLSSA files at hand click the blue button in the middle of the Auto EQ block. In the next dialog select the Source Response section. On the Woofer tab select the Frequency Response radio button and load the woofers response in MLSSA format. Change tab to Tweeter and do the same for the tweeter response (I used the combined response from my mid and tweeter as the tweeter response). The dialog should look something like this now:
Go to the Target Response section next, here you can set the target and weight (the wizard will spend more resources like filters on areas with higher weight and vice versa). Lets go with the default flat target line for now (you can also set high and low cut with the blue dots).
Skip to the Filters section next. Here you specify your crossover filter. In this example I have specified a fourth order Linkwitz-Riley filter @ 600 Hz.
Jump back to the Design Settings section. Here you can set the amount of filters you want to spend and your high cut and low cut points. For this example, low cut is set to 50 Hz on the Woofer tab since a Linkwitz transform will be used to extend it from 50 Hz. The high cut is set to 600 Hz since that is the crossover point. Check the checkbox named Include Crossover In Equalized Curve and switch to the Tweeter tab. I set the low cut to 600 Hz because of the crossover and high cut to 17 kHz. I also check the checkbox named Include Crossover In Equalized Curve on the Tweeter tab. Now hit the button down right named Design All and watch the wizard work its magic.
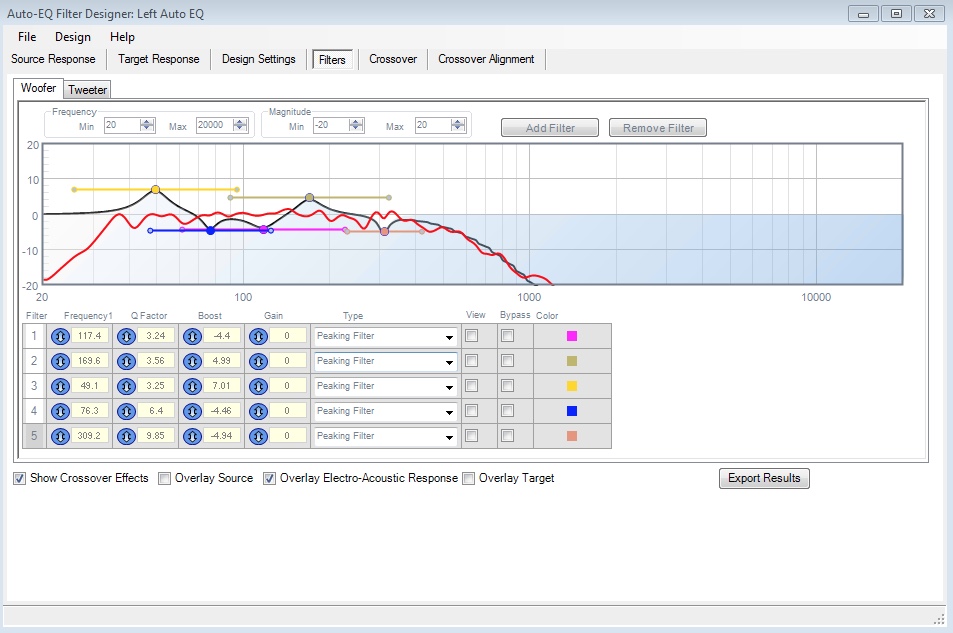
Now jump to the Filters section, check the checkboxes named Show Crossover Effects and Overlay Electro-Acoustic Response. Make a sanity check on both the Woofer tab and Tweeter tab. Tweak input settings and rerun the wizard until satisfied.
Last but not least, jump to the Crossover Alignment section. Press the Auto Align button and watch the wizard do its magic with the phase alignment.
Close the dialog when you are satisfied with the result and continue with the other side. Next up is the Linkwitz transform, I save it for the next post.