Modding a cheap 24-position rotary switch from China

Have you been tempted to buy one of those cheap rotary switches from China to make a stepped attenuator? I sure have and I also did. It turned out a bit of a disappointment because the detent mechanism was very stiff rendering the switch pretty useless as a stepped attenuator. But I managed to figure out a fairly easy mod that would transform it into something with a great tactile feel.
Fixing the tactile feel is great but it will not fix some of the the other shortcomings of these switches. I guess you get what you pay for. The wipers are small and flimsy and drags around bare aluminum tongues. It is otherwise quite well made apart from the stiff springs in the detent mechanism.
This is what they look like when you get them. You first have to peel off the red lacquer locking the nuts on the back side.

This is what it looks like with the back plate and the first deck of tongues removed. Note the black plastic wheel with slots still on the axle. The wiper is placed in one of the slots, note the original position because it can be re-positioned in any slot. Now CAREFULLY pry the plastic wheel from the axle WITHOUT BRAKING IT. Work from side to side until it comes loose.

This is what it looks like with the plastic wheel removed. Note the solid aluminum deck. This is one of the poles and this deck only got one solder tag. Keep moving through the decks until...

There are no decks left. DO NOT TRY TO PRAY THE METAL WHEEL WITH SLOTS. Instead flip the switch over to the other side and locate the C washer locking the axle in place.

The axle can be pushed from behind to ease the tension. BE REALLY CAREFUL REMOVING THE WASHER BECAUSE IT MIGHT FLY AWAY. It might be worth doing it inside a transparent plastic bag because you don't want it to fly away while removing it!

The detent mechanism is under the metal wheel with slots. It contains two spring-loaded balls. BE CAREFUL NOT TO LOOSE THE BALLS when removing the axle with the metal wheel. You will also have two stiff springs that needs to be replaced in order to fix the tactile feel of the switch.

The next question was what kind of string to replace the original ones with? The holes are 3.2 mm in diameter and I tried different springs from ball-pens to find the right stiffness. I could not find a perfect match so I searched the net for information about how to make your own springs. I figured that I would need a spring out of around 0.2 mm based on my test with ball-pen. It is close to a 010 steel guitar string. I only had 011 and 013 at home so I went with 011.

The holes are 3.2 mm and the spring should not touch against the sides of the seats. I knew the spring would expand some after its been wound so I took a piece of 2 mm round bar and made marking for how long I wanted the springs. I then mounted the round bar and the string in my screw gun. USE PROTECTIVE GLOVES AND GLASSES FOR THE NEXT STEP!
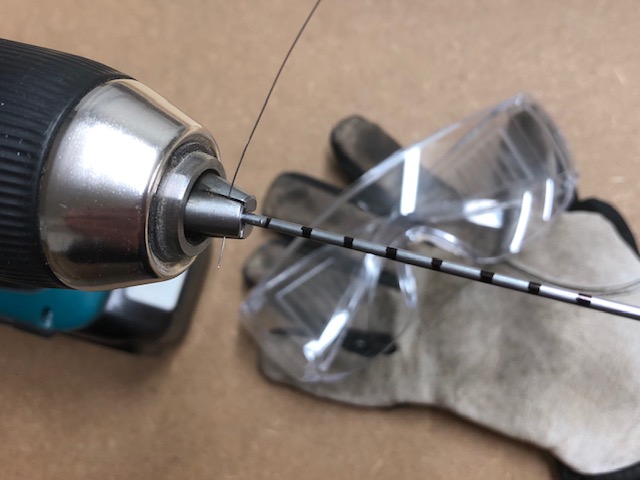
Slowly turn the round bar with the screw gun while keeping a tension on the string with your other hand. I made fewer loops between the markings and some close together at the markings. This is what it looks like when the tension is released (it looked perfectly as long as the tension was uphold).
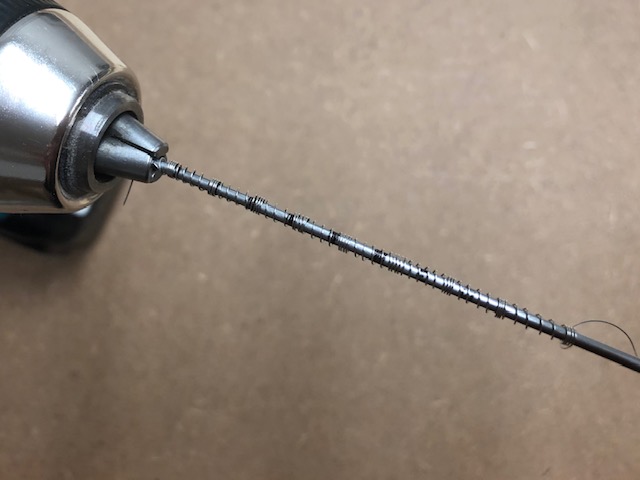
I used my nippers to cut the string into perfect little springs. They fitted perfectly into the seats and I didn't do anything else to these springs.

I just took a couple of matching springs, inserted them into their seats and here with the spring-loaded balls sitting on top of them before I reassembled the switches. I also took the opportunity to apply some grease to the detent mechanism.

The final result? I fine smooth click-e-te-click totally different from de original clunky stiff tack-tack tack-tack. These cheap rotary switches are now actually useful as stepped attenuators. I used the The Goldpoint 24-Position Audio Taper for a 10k log taper and I also made another 10k with a lin taper to be use as balance control. These switches got 24 positions not perfect if you need an attenuator with a center detent. Position 13 is luckily positioned straight up so I soldered a link between R1 and R2. It gives 23 different values (position 1 and 2 has the same value) with position 13 in the middle. If I ever want to use the full 24 position lin taper I can easily remove the link between R1 and R2.

Last but not least, drawings of the 24-position rotary switch (click image for higher resolution). I needed them when I fabricated my front-panel.


