The 3-Way Retro Part 8.

With the speakers done it is now time to tackle the DSP. Lets start by considering the gain structure. The documentation of the DSP state a maximum Vin of 1.2 Vrms and a (balanced) Vout of typically > 3 Vrms. I was planning to limit my Linkwitz transform to a 10 dB gain. 10 dB equals x3.16, 1 V in -> 3.16 V out. But what about the input sensitivity of the power amps?
Lets start with the TPA3251 I was planning to use for HF duty. Nothing is stated about the sensitivity so we have to do a quick estimate based on the stated voltage gain: Av = 20 dB @ 1 kHz. I will initially use a 28V SMPS600RS from Connex Electronic for both amps. 20 dB gain equals x10 -> 28/10 = 2.8 V input sensitivity.
Now lets look at the TPA3255 intended for LF duty. Av = 21.5 dB @ 1 kHz, 21.5 dB equals x11.88 -> 28/11.88 = 2.36 V. It is less than for HF and it is LF who got the added 10 dB Linkwitz transform. The easy solution is to get a separate 48V SMPS600RS for the TPA3255. Sensitivity would then be 48/11.88 = 4.05 V.
The TPA3255 is the limiting factor with a shared 28 V power supply. 2.36 V sensitivity -10 dB for the Linkwitz transform equals < 0.75 V into the DSP if we want to avoid clipping. A 48V power supply would make that < 1.28 V instead.
My preamp is based around Rod Elliott's P88. Luckily it got a configurable gain, it is set to 4 dB in my case. The RIAA stage in my preamp is based around Rod Elliott's P06. It has a gain of 41.2 dB @ 1 kHz. A Ortofon 2M has a Vout of 5.5 mV and it would equal 0.63 V after the RIAA stage and after another 4 dB 1 V. It is < 1.2 V so it should not make the DSP clip.
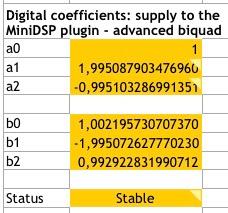
Additional measurements with final stuffing show a -3 dB @ 50 Hz and a baffle step loss of around 6 dB from 319 Hz as expected. The speakers will be positioned quite close to a wall so my guess is that I will gain at least 3 dB from the room. Updating the True Audio's Linkwitz Transform Circuit Design Spreadsheet gives a f(0) = 51.84 Hz and Q(0) = 0.73 with a DC gain of 9.5 dB. Updating the miniDSP spreadsheet gives the following digital coefficients:
And it would equal something like this in SigmaStudio:

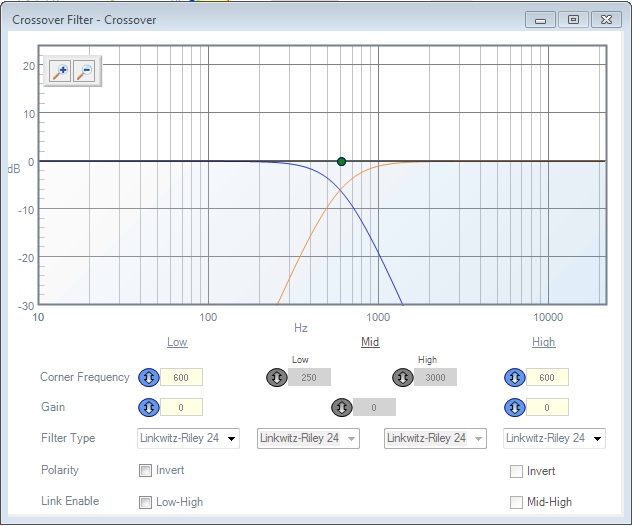
The rest of the DSP setup is as follows, first the main schematics:

Lets start with the "XO and EQ" hierarchy board. First the Linkwitz transform, nothing new just updated values.

This is what the "Source Response" tab looks like. But how did I get the frequency response data?

I used REW to make measurements in the room. I then combined all these measurements into one Average Response (the button down left in the "All SPL" graph). I then exported the average response to a text file. Do not export all data from REW if you did your measurement in high resolution. It will take the Auto EQ for ever to design the filter if it got too much to work with. I used the following settings in REW:

#!/usr/bin/env python3
import argparse
"""Rew2SigmaStudio, a script to convert from REW to SigmaStudio MLSSA text format."""
parser = argparse.ArgumentParser(description='Convert REW files for use in SigmaStudio.')
parser.add_argument('input', help='Input File')
parser.add_argument('-o', '--output', help='Output File')
args = parser.parse_args()
if not args.output:
args.output = '{}-MLSSA.txt'.format(args.input)
with open(args.input, 'r') as infile:
with open(args.output, 'w') as outfile:
print('"MLSSA text file for SigmaStudio converted from REW."', file=outfile)
print(' "Hz" "Mag (dB)" "deg"', file=outfile)
for line in infile:
if not line.startswith('*'):
tokens = line.split(maxsplit=3)
print(', '.join([token.rjust(10) for token in tokens]), file=outfile)
Save the text into a script called "Rew2SigmaStudio.py" for example. I just drag-and-drop the files exported from REW on top of the Python-script and it happily convert them into a format SigmaStudio can read (it also works with the super handy Speaker Response : MLSSA block found under "System" in SigmaStudio).
Next up is the "Target Response" tab. Note the blue target line. I initially went with totally flat but I found the sound too forward and clinical. I reverted to the same strategy as I used in my 3WC build (read the part about the preferred target frequency response is a straight line starting at 0 dB @ 20 Hz down to -10 dB at 20 kHz). And the final result now sounded better to me.
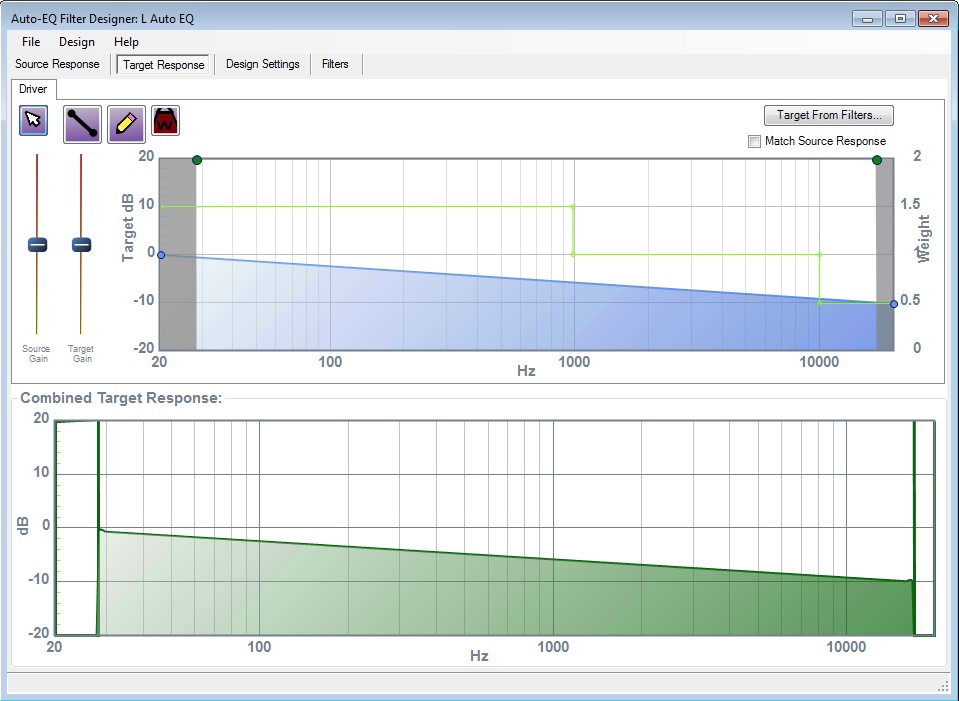
Another trick in this tab is the use of weight, it is the yellow field below. I found the majority of problems in the lower end of the spectrum, floor bounce, baffle step etc. So I wanted to prioritize the area below 1 kHz. The upper end was quite clean so I also indicated that the area above 10 kHz had the lowest priority.

Next tab is the "Design Settings" here after I let it design the filters. I ended up using 15 filters per channel (because I can). I started from 30 Hz and went up to 17 kHz. I left the rest to natural roll off.

The last tab is the "Filters" tab. Try to do this in less than a minute manually!

I have now used one filter for Linkwitz transform another couple for a fourth order LR and another 30 for room correction. This sound great but I still got plenty of unused processor cycles and SDRAM in my DSP so lets continue with something even more exciting.
I have always loved the variable loudness on my vintage Yamaha CA-600. The only drawback is that you have to manually adjust it. What about a loudness control that automatically adapt is self to the input level in real time? I used the one by KJBob as an inspiration and made the one in the "Adaptive Loudness" hierarchy board and tweaked it to my liking.
It looks pretty much like the one by KJBob with some updated values (click to zoom):

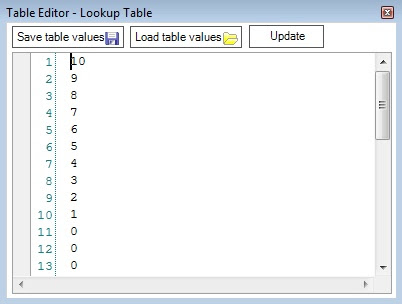
I stretched the Log Lookup Table table a bit (33 entries in total) but the initial values are just the same, the rest is all zeros.
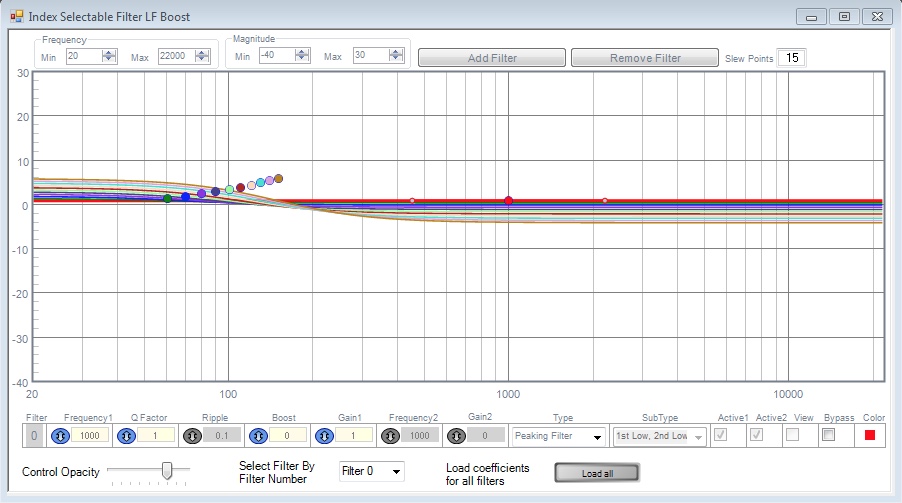
I also tweaked the ten filter curves a bit. I lowered the boost interval from 20 dB to 10 dB (but kept the gain the same). These are the LF Boost filters:
And I did the same for the HF Boost filters:

It is pretty amazing to study how the DSP work in real time. To see how it is tracking the input level and seamlessly switches between the filters. It sounds pretty darn good too! So that was another 20 filters for adaptive loudness control. Just like that. Got to love the DSP. :)
Finally a picture of the speaker next to a side board in teak, just to illustrate how blonde it is. I am pretty happy with the result but I still think it would look way better in a darker wood...


