Arduino Goes to Town, Part 2.

First of all, before I tackle the button bounce issue, know that there are numerous microcontroller alternatives to the Arduino Uno. Faster, more powerful, smaller and even cheaper. This is all good and you might look at it as an opportunity. I will use the Arduino Uno because it might be the most accessible, forgiving and easy one to get started with. The Arduino Uno however got its limitations so I will try to stay on a diet. That goes for any external libraries and I will mostly pick from the ones in the official repository.
Ok, first question, how is the input selection supposed to work and how to interface the Arduino to the input switching PCB? My input switching board is built like Figure 3 in Rod Elliots P163. It uses an ULN2003A to drive the relays. It got seven inputs and outputs but I only use four of them since I only got four switches. This is how I interfaced the Arduino Uno to it:
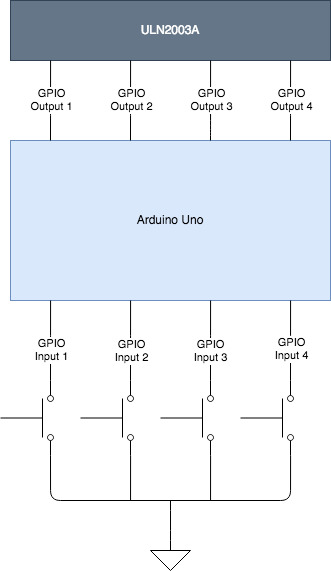
Can it really be that simple? Yes it can. So lets carry on to the software part of it. Debouncing is quite easy to implement in software but I am going to use an excellent external library to do the heavy lifting. The library is named InputDebounce and it comes with all sane defaults. I want my buttons to act as a set of radio buttons and I want the selection to be persistent, i.e. it should restore its state even after a power cycle. The easies way to implement persistence is to use the Arduino EEPROM to save and restore the state. The only problem is he chance of wearing out the EEPROM if we always use the same place to persist our data. Another external library to the rescue, EEWL. With those two libraries in mind lets take a look at one way of implementing the switch logics.
The source below is hopefully straight forward enough for anyone to understand. It includes the libraries and declares a set of defines for EEWL buffer length, start address, GPIO PIN numbers for inputs and outputs. It then declares variables for the EEWL and button object and for the selected input button.
The flow is straight forward. Init everything in the setup function and read previous state from EEPROM (or select and save default if no previous state exists). Keep polling the button objects for ever in the loop function. The btnInputCallback callback function is called when a button is pressed. It checks if selection has changed and saves the state to EEPROM if it has. It might look like a lot of code but most of it is just repetition.
#include <eewl.h>
#include <InputDebounce.h>
#define BUFFER_LEN 10
#define BUFFER_ADR 0x10
#define INPUT1_PIN 3
#define INPUT2_PIN 4
#define INPUT3_PIN 5
#define INPUT4_PIN 6
#define OUTPUT1_PIN 8
#define OUTPUT2_PIN 9
#define OUTPUT3_PIN 10
#define OUTPUT4_PIN 11
#define DEFAULT_INPUT 1
EEWL eewl(selectedInput, BUFFER_LEN, BUFFER_ADR);
byte selectedInput = DEFAULT_INPUT;
InputDebounce btnInput1;
InputDebounce btnInput2;
InputDebounce btnInput3;
InputDebounce btnInput4;
// return input selection for pin
byte pinToSelection(byte pin) {
byte selection;
switch (pin) {
case INPUT2_PIN:
selection = 2;
break;
case INPUT3_PIN:
selection = 3;
break;
case INPUT4_PIN:
selection = 4;
break;
default:
selection = 1;
break;
}
return selection;
}
// return pin for input selection
byte selectionToPin(byte selection) {
byte pin;
switch (selection) {
case 2:
pin = INPUT2_PIN;
break;
case 3:
pin = INPUT3_PIN;
break;
case 4:
pin = INPUT4_PIN;
break;
default:
pin = INPUT1_PIN;
break;
}
return pin;
}
// set selected output and save to eeprom
void setOutput(byte selection) {
(selection == 1) ? digitalWrite(OUTPUT1_PIN, HIGH) : digitalWrite(OUTPUT1_PIN, LOW);
(selection == 2) ? digitalWrite(OUTPUT2_PIN, HIGH) : digitalWrite(OUTPUT2_PIN, LOW);
(selection == 3) ? digitalWrite(OUTPUT3_PIN, HIGH) : digitalWrite(OUTPUT3_PIN, LOW);
(selection == 4) ? digitalWrite(OUTPUT4_PIN, HIGH) : digitalWrite(OUTPUT4_PIN, LOW);
if (selection != selectedInput) {
selectedInput = selection;
eewl.put(selectedInput);
}
}
// input selection callback
void btnInputCallback(byte pin) {
byte selection = pinToSelection(pin);
if (selection != selectedInput) {
setOutput(selection);
}
}
// handle button debouce
void processButtons() {
unsigned long now = millis();
btnInput1.process(now);
btnInput2.process(now);
btnInput3.process(now);
btnInput4.process(now);
}
void setup() {
// init output pins
pinMode(OUTPUT1_PIN, OUTPUT);
pinMode(OUTPUT2_PIN, OUTPUT);
pinMode(OUTPUT3_PIN, OUTPUT);
pinMode(OUTPUT4_PIN, OUTPUT);
// get persisted data
eewl.get(selectedInput);
// output selected input
setOutput(selectedInput);
// init buttons
btnInput1.registerCallbacks(btnInputCallback, NULL);
btnInput2.registerCallbacks(btnInputCallback, NULL);
btnInput3.registerCallbacks(btnInputCallback, NULL);
btnInput4.registerCallbacks(btnInputCallback, NULL);
btnInput1.setup(INPUT1_PIN);
btnInput2.setup(INPUT2_PIN);
btnInput3.setup(INPUT3_PIN);
btnInput4.setup(INPUT4_PIN);
}
void loop() {
processButtons();
}
That was the easy part. Implementing a frequency analyser might prove a bit more challenging. But stay tuned...


